Want the pattern? Well fine, you're getting it whether you like it or not. ;) Feedback, please, this is my first published pattern (and I'm slightly scared I might have messed up on the maths)!
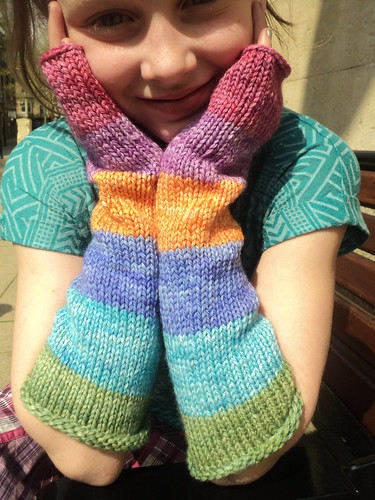
Skittles Mittens
Skittles Mittens
You
will need:
Approximately 100g aran weight yarn OR for stripes, six lots of 25m (27 yards): I used around 15g each colour of my own hand dyed pure merino aran: red/pink, violet, orange, bluebell, turquoise, and lime. If in doubt, always err on the side of having left-overs!
5mm double pointed needles (or equivalent circular needle for magic loop method).
Sizing:
S (M, L)
Small should fit an older child or slim adult wrist – wrist 16cm. Medium – wrist 17cm. Large – wrist 18cm. They are stretchy!
S (M, L)
Small should fit an older child or slim adult wrist – wrist 16cm. Medium – wrist 17cm. Large – wrist 18cm. They are stretchy!
Colour
notes:
For the wide rainbow stripes, change colour every fourteen rows. At the start of the second row in each colour stripe, slip the first stitch (this will be the first stitch you worked in the new colour) and then continue knitting normally, this will help the colours line up nicely and give a more seamless appearance.
For the wide rainbow stripes, change colour every fourteen rows. At the start of the second row in each colour stripe, slip the first stitch (this will be the first stitch you worked in the new colour) and then continue knitting normally, this will help the colours line up nicely and give a more seamless appearance.
Pattern:
Cast on 38 (40, 42) stitches using your preferred cast on method. (If you will be working both mittens together using the magic loop method, cast on all the stitches for mitten two next, arrange on the needles for knitting rounds, and then proceed with the instructions – on decrease rows ensure you decrease on the last stitches of *each* mitten as indicated in the pattern. I find it helpful to mark the first mitten with a stitch marker to make it easier to keep track of working the pattern stitches twice before proceeding with the next row instruction.)
Cast on 38 (40, 42) stitches using your preferred cast on method. (If you will be working both mittens together using the magic loop method, cast on all the stitches for mitten two next, arrange on the needles for knitting rounds, and then proceed with the instructions – on decrease rows ensure you decrease on the last stitches of *each* mitten as indicated in the pattern. I find it helpful to mark the first mitten with a stitch marker to make it easier to keep track of working the pattern stitches twice before proceeding with the next row instruction.)
Join for working in the round.
Row 1-14 – knit every stitch.
Row 15 – knit to last two stitches of (each) mitten, k2tog.
Row 16-18 – knit every stitch.
Row 19 – knit to last two stitches of (each) mitten, k2tog.
Continue in this manner – alternating three rows of plain knitting with one decrease row, and changing colours if you wish to do so – until row 51**, which will be your last decrease row. Knit a further four rows plain. If you are working the prescribed colour changes, this will also be your last row of your fourth stripe.
Mitten A:
Row 57 (change colour for stripe five, if you are following the stripe instructions) – knit every stitch
Row 58 – k4, yo, k1, yo, knit to end of row.
Row 59 – k4, yo, k3, yo, knit to end of row.
Row 60 – k4, yo, k5, yo, knit to end of row.
Continue as above, increasing the two stitches per row for each thumb section, until row 62 when you should have 9 stitches between the yarn-overs.
Row 63 – k4, p11, knit to end of row.
Row 64 – k4, cast off the 11 stitches for the thumb hole, turn your work and cast on five new stitches, turn again to the side you were working before and continue to the end of the row.
Knit every stitch for the next twenty rows, then cast off all stitches (if you are striping, this will be six plain rows to finish off your fifth colour stripe, then a 14 row stripe of your final colour).
Mitten B:
Row 57 (change colour for stripe five, if you are following the stripe instructions) – knit every stitch
Row 58 – knit to last five stitches, yo, k1, yo, k4.
Row 59 – knit to last five stitches, yo, k3, yo, k4.
Row 60 – knit to last five stitches, yo, k5, yo, k4.
Continue as above, increasing the two stitches per row for each thumb section, until row 62 when you should have 9 stitches between the yarn-overs.
Row 63 – knit to the first yo on the previous row, p11, k4.
Row 64 – knit to the first purl stitch on the previous row, cast off the 11 stitches for the thumb hole, turn your work and cast on five new stitches, turn again to the side you were working before and continue to knit the last four stitches of the row.
Knit every stitch for the next twenty rows, then cast off all stitches (if you are striping, this will be six plain rows to finish off your fifth colour stripe, then a 14 row stripe of your final colour).
Both mittens: Sew in ends, and block lightly.
Ravelry download page: download now **please note there is a mistake in the download version, and this instruction reads "until row 52, which will be your last in decrease row" - row 51 is the correct row number! :)
Row 15 – knit to last two stitches of (each) mitten, k2tog.
Row 16-18 – knit every stitch.
Row 19 – knit to last two stitches of (each) mitten, k2tog.
Continue in this manner – alternating three rows of plain knitting with one decrease row, and changing colours if you wish to do so – until row 51**, which will be your last decrease row. Knit a further four rows plain. If you are working the prescribed colour changes, this will also be your last row of your fourth stripe.
Mitten A:
Row 57 (change colour for stripe five, if you are following the stripe instructions) – knit every stitch
Row 58 – k4, yo, k1, yo, knit to end of row.
Row 59 – k4, yo, k3, yo, knit to end of row.
Row 60 – k4, yo, k5, yo, knit to end of row.
Continue as above, increasing the two stitches per row for each thumb section, until row 62 when you should have 9 stitches between the yarn-overs.
Row 63 – k4, p11, knit to end of row.
Row 64 – k4, cast off the 11 stitches for the thumb hole, turn your work and cast on five new stitches, turn again to the side you were working before and continue to the end of the row.
Knit every stitch for the next twenty rows, then cast off all stitches (if you are striping, this will be six plain rows to finish off your fifth colour stripe, then a 14 row stripe of your final colour).
Mitten B:
Row 57 (change colour for stripe five, if you are following the stripe instructions) – knit every stitch
Row 58 – knit to last five stitches, yo, k1, yo, k4.
Row 59 – knit to last five stitches, yo, k3, yo, k4.
Row 60 – knit to last five stitches, yo, k5, yo, k4.
Continue as above, increasing the two stitches per row for each thumb section, until row 62 when you should have 9 stitches between the yarn-overs.
Row 63 – knit to the first yo on the previous row, p11, k4.
Row 64 – knit to the first purl stitch on the previous row, cast off the 11 stitches for the thumb hole, turn your work and cast on five new stitches, turn again to the side you were working before and continue to knit the last four stitches of the row.
Knit every stitch for the next twenty rows, then cast off all stitches (if you are striping, this will be six plain rows to finish off your fifth colour stripe, then a 14 row stripe of your final colour).
Both mittens: Sew in ends, and block lightly.


Yes, please! Those are beautiful. Thanks!
ReplyDeleteYou're welcome, thank you. :) I do hope you enjoy knitting them and they turn out perfectly, please do let me know how you get on with them and whether there's anything I can do to improve my pattern writing. :) xxx
DeleteI think your pattern writing is excellent (and I am a very beginner knitter). I will add it to my ravelry queue and wait patiently for the wool :-)
ReplyDeleteThe one thing that would probably help me a lot, is if I could see a picture of the thumb holes. I am pretty slow at visualizing things, so a photos of what I am aiming for would be great.
Aw thanks! I will try to rectify that the next time I knit a pair. :)
DeletePLEASE do a tutorial for these worked flat! I can't do magic loop and the prospect of doing two at once is terrifying! lol x
ReplyDeleteYou can absolutely use dpns for these, knitting them one at a time. Have you mastered dpns? :)
DeleteFollow the first part of the instructions, then section A, to complete the first mitten. Then cast on again and work the first part of the instructions, then section B, for the second mitten.